JUnit5 + Android
on Android
Motivation
While UI testing tends to use various frameworks like Espresso or Robolectric; JUnit is still a staple of pure logic testing. For Android, most of us are still using JUnit4. On my Java projects (non-Android), I have been using JUnit5 instead. While there are quite a few new features one might point out, the one that initially caught my attention was the more aesthetically pleasing report box.
For the purpose of this post, I’ll assume you are starting with an empty project, compileSdkVersion 26+ and buildToolsVersion “26.0.1” or higher.
Setup
Marcel Schnelle was nice enough to contribute the android-junit5 gradle plugin that we’ll be using.
top-level build.gradle
In your top-level build.gradle, you currently have a section that looks something like this:
buildscript {

    repositories {
        google()
        jcenter()
    }
    dependencies {
        classpath 'com.android.tools.build:gradle:3.0.0-beta5'

        // NOTE: Do not place your application dependencies here; they belong
        // in the individual module build.gradle files
    }
}
You will want to add this line inside that dependencies block:
classpath "de.mannodermaus.gradle.plugins:android-junit5:1.0.0-M6"
app-level build.gradle
At the top of the app-level build.gradle, you probably have something like this:
apply plugin: "com.android.application"
Add this line just under it:
apply plugin: "de.mannodermaus.android-junit5"
Go down the page to your dependencies section.
If you have something like
testImplementation 'junit:junit:4.12'
You will want to remove that. Any JUnit4 tests that you keep should be handled by the JUnit5 vintage engine.
Inside that dependencies block, add the following instead:
testApi junitJupiter()
testApi junitParams()
You will want to configure the platform as well. Create this section as a sibling to android and dependencies (ie: at the same level):
junitPlatform {
    // The JUnit Jupiter dependency version to use; matches the platform's milestone by default
    jupiterVersion "5.0.0-M6"

    // The JUnit Vintage Engine dependency version to use; matches the platform's milestone by default
    vintageVersion "4.12.0-M6"
}
Of course, you’ll probably want to define these versions in a top-level ext or maybe a junit.gradle; but we are trying to keep it simple and in line with the README provided by the plugin.
Running the tests
There are a couple ways you can run the tests.
from the command line
./gradlew test
That will run through your tests (debug and release) and output a summary that looks similar to this (depending on the number of tests you have):
Test run finished after 2117 ms
[         7 containers found      ]
[         0 containers skipped    ]
[         7 containers started    ]
[         0 containers aborted    ]
[         7 containers successful ]
[         0 containers failed     ]
[        11 tests found           ]
[         1 tests skipped         ]
[        10 tests started         ]
[         0 tests aborted         ]
[        10 tests successful      ]
[         0 tests failed          ]
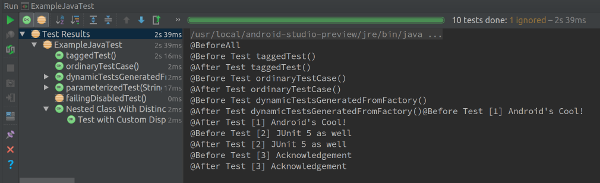
from Android Studio
The simplest way is to right-click on your test and choosing Run <Test Name>.
You can also setup Run Configurations, etc - but for now, I would recommend running the individual tests one-off while you are trying it out.
While it won’t provide the same summary block as you would see from the CLI, it does indicate pass/skip/fail:
JUnit5 Samples
To get you started, Marcel has provided ExampleJavaTest.java and ExampleKotlinTest.kt. There are quite a few good examples and I recommend perusing those before you start writing your own JUnit5 tests. Of specific note is the comment at the beginning of each one that show the comparison between JUnit4 and JUnit5 for Java or Kotlin.
You can also go directly to the JUnit5 User Guide to get samples and details.
Let’s look at a couple highlights. I will tend to focus on what the failure messages look like, since success messages are pretty bland ;)
Important Changes
If you haven’t already, don’t forget to sync your project to capture the updated dependencies before moving forward.
Package Name Changes
- JUnit3 used
junit.framework - JUnit4 used
org.junit - JUnit5 uses
org.junit.jupiter
Disabled
Instead of @Ignore use @Disabled
Extensions
Runner, @Rule and @ClassRule replaced with Extensions
DisplayName
You can specify a more verbose display name to be used in error reports and logs.
Let’s compare.
Without the DisplayName:
@Test
void someTest() {
    assertFalse(true);
}
produces:
Failures (1):
  JUnit Jupiter:MyUnitTest:someTest()
    MethodSource [className = 'com.example.MyUnitTest', methodName = 'someTest', methodParameterTypes = '']
    => org.opentest4j.AssertionFailedError:
Whereas adding the @DisplayName:
@Test
@DisplayName("This is some test for some reason, see ticket [ABC-123]")
void someTest() {
    assertFalse(true);
}
produces:
Failures (1):
  JUnit Jupiter:MyUnitTest:This is some test for some reason, see ticket [ABC-123]
    MethodSource [className = 'com.example.MyUnitTest', methodName = 'someTest', methodParameterTypes = '']
    => org.opentest4j.AssertionFailedError:
Lambda Support
JUnit5 updates the Assertions with Lambda support.
To use lambdas, you will want to make sure to add this to the android section of your app-level build.gradle and re-sync:
compileOptions {
    sourceCompatibility JavaVersion.VERSION_1_8
    targetCompatibility JavaVersion.VERSION_1_8
}
grouped assertions
Let’s say you have two assertions that you want to pass or fail together. For that, you can use assertAll() for a grouped assertion.
assertAll("person",
    () -> assertEquals("Jane", person.getFirstName()),
    () -> assertEquals("Doe", person.getLastName())
);
And assuming your person pojo is actually named John rather than Jane…
Failures (1):
  JUnit Jupiter:MyUnitTest:hasFullName()
    MethodSource [className = 'com.example.MyUnitTest', methodName = 'hasFullName', methodParameterTypes = '']
    => org.opentest4j.MultipleFailuresError: person (1 failure)
        expected: <Jane> but was: <John>
It should be noted that it will run through both of them. It won’t bail on the first failed assert.
Failures (1):
  JUnit Jupiter:MyUnitTest:hasFullName()
    MethodSource [className = 'com.example.MyUnitTest', methodName = 'hasFullName', methodParameterTypes = '']
    => org.opentest4j.MultipleFailuresError: person (2 failures)
        expected: <Jane> but was: <John>
        expected: <Smith> but was: <Doe>
grouped assertions with code blocks
What if you need it to do some processing and maybe skip some of the tests?
A bit of a stupid example, but should be easy to follow.
        assertAll("person",
                () -> {
                    String firstName = person.getFirstName();
                    assertNotNull(firstName, "First name can not be null");

                    assertAll("first name",
                            () -> assertTrue(firstName.length() >= 2, "At least 2 characters"),
                            () -> assertTrue(firstName.matches("[A-Za-z]*"), "Alpha only"));
                },
                () -> {
                    String lastName = person.getLastName();
                    assertNotNull(lastName, "Last name can not be null");

                    assertAll("last name",
                            () -> assertTrue(lastName.length() >= 2, "At least 2 characters"),
                            () -> assertTrue(lastName.matches("[A-Za-z]*"), "Alpha only"));
                }
        );
Let’s say our Person was J0hn/<null>, then you will see two errors. One for the first nested “first name” block and one for the second code block.
Failures (1):
  JUnit Jupiter:MyUnitTest:hasFullName()
    MethodSource [className = 'com.example.MyUnitTest', methodName = 'hasFullName', methodParameterTypes = '']
    => org.opentest4j.MultipleFailuresError: person (2 failures)
        first name (1 failure)
        Alpha only
        Last name can not be null ==> expected: not <null>
I think you’d really need a good reason to do a deeply nested assertion like this. The single assertAll() isn’t so bad though.
additional assertions
The Junit5 page lists some other examples that look interesting, including assertThrows and assertTimeout.
assumptions
How about only running something on Jenkins?
    assumingThat(System.getenv("BUILD_NUMBER") != null,
        () -> {
            // only perform this test on the CI server
        });
When run on a local dev build, that test would be skipped. When run on Jenkins, which sets that environment variable, it would be run. If the devs needed to simulate the CI environment, they could temporarily set the variable locally. Or any other boolean condition for that matter.
Composed Annotations
JUnit5 makes it easy to define your own filterable tag.
Let’s look at an exampe. First you define your tag.
import java.lang.annotation.ElementType;
import java.lang.annotation.Retention;
import java.lang.annotation.RetentionPolicy;
import java.lang.annotation.Target;

import org.junit.jupiter.api.Tag;

@Target({ ElementType.TYPE, ElementType.METHOD })
@Retention(RetentionPolicy.RUNTIME)
@Tag("SmokeTest")
public @interface Smoke {
}
Then on any of your tests, you can specify that they belong to our new SmokeTest ruleset, using the interface name:
@Test
@Smoke
void someRandomTest() { ... }
Then, from the junitPlatform configuration in our app-level build.gradle, you can specify a filter:
filters {
    tags {
        include 'SmokeTest'
        // exclude 'SmokeTest'
    }
}
The Test cases use the shorthand annotations; but the filter uses the actual string used for the tag.
Of course, you could use @Tag("SmokeTest") everywhere, instead of creating the Smoke class… but you have to admit the annotation looks a bit cleaner.
Repeated Tests
Does one of your tests seem flaky? Would you prefer it ran more than once? You can mark it as a Repeated Test.
Instead of @Test use the @RepeatedTest annotation:
@RepeatedTest(3)
void someTest() {
    assertFalse(true);
}
This will run the test multiple times and tell you how many times it failed.
Failures (3):
  JUnit Jupiter:MyUnitTest:someTest():repetition 1 of 3
    MethodSource [className = 'com.example.MyUnitTest', methodName = 'someTest', methodParameterTypes = '']
    => org.opentest4j.AssertionFailedError:
  JUnit Jupiter:MyUnitTest:someTest():repetition 2 of 3
    MethodSource [className = 'com.example.MyUnitTest', methodName = 'someTest', methodParameterTypes = '']
    => org.opentest4j.AssertionFailedError:
  JUnit Jupiter:MyUnitTest:someTest():repetition 3 of 3
    MethodSource [className = 'com.example.MyUnitTest', methodName = 'someTest', methodParameterTypes = '']
    => org.opentest4j.AssertionFailedError:
Parameterized Tests
What if you want to run the same test a couple times, but with a different parameter each time? In this case, you would instead use the @ParameterizedTest annotation:
@ParameterizedTest
@ValueSource(strings = {"First", "Second"})
void someTest(String param) {
    assertEquals("Third", param);
}
Results in:
Failures (2):
  JUnit Jupiter:MyUnitTest:someTest(String):[1] First
    MethodSource [className = 'com.example.MyUnitTest', methodName = 'someTest', methodParameterTypes = 'java.lang.String']
    => org.opentest4j.AssertionFailedError: expected: <Third> but was: <First>
  JUnit Jupiter:MyUnitTest:someTest(String):[2] Second
    MethodSource [className = 'com.example.MyUnitTest', methodName = 'someTest', methodParameterTypes = 'java.lang.String']
    => org.opentest4j.AssertionFailedError: expected: <Third> but was: <Second>
There are quite a few built-in annotations. Here are some examples:
@ValueSource(strings = {"First", "Second"})
@ValueSource(ints = {1, 2})
@ValueSource(longs = {1L, 2L})
@ValueSource(doubles = {1.2, 2.3})
@EnumSource(TimeUnit.class)
@EnumSource(value = TimeUnit.class, names = { "DAYS", "HOURS" })
@EnumSource(value = TimeUnit.class, mode = EXCLUDE, names = { "DAYS", "HOURS" })
@EnumSource(value = TimeUnit.class, mode = MATCH_ALL, names = "^(M|N).+SECONDS$")
There are also @MethodSource, @CsvSource, @ArgumentsSource, et cetera.
Nested Tests
How often have you seen test method names that seemed more like an example of an extra-strong password? test_myService_newUser_loadedSettings – or something equally verbose? This tends to happen over time when devs have a single test class matched to a single class to test. They want to validate multiple scenarios, and rather than creating a 1-to-many relationship between the classes, the method names get longer and longer.
JUnit5 introduces Nested Tests as a way to address this.
Let’s look at an example. Let’s say you have this inside your MyUnitTest.java:
    @Nested
    @DisplayName("new user")
    final class NewUserTest {

        @Test
        @DisplayName("load settings")
        void loadSettings() {
            assertEquals("loaded", "not found");
        }
    }
Run the tests
./gradlew test
You’ll see it output this:
Failures (1):
  JUnit Jupiter:MyUnitTest:new user:load settings
    MethodSource [className = 'com.example.MyUnitTest$NewUserTest', methodName = 'loadSettings', methodParameterTypes = '']
    => org.opentest4j.AssertionFailedError: expected: <loaded> but was: <not found>
Obviously, it wouldn’t be too helpful if there was only one test inside the Nested Test; and I’m not making any judgement call of whether you should use it or break your tests into smaller files. It’s just another tool in your toolbox.
Dependency Injection
You may have some pojo:
public class MyPojo
{
    private static final AtomicInteger count = new AtomicInteger(0);
    public final int id;

    public MyPojo() {
        id = count.incrementAndGet();
        System.out.format("Created MyPojo with id: %d\n", id);
    }
}
And you want to pass an injected version of it into your test:
@Test
void someTest(MyPojo myPojo) {
    assertEquals(1, myPojo.id, "ID must be 1");
}
There are two steps you need to take.
ParameterResolver
First, you need to define a ParameterResolver to construct the instances.
public class MyPojoResolver implements ParameterResolver {
    @Override
    public boolean supportsParameter(ParameterContext parameterContext, ExtensionContext extensionContext) throws ParameterResolutionException {
        return parameterContext.getParameter().getType().equals(MyPojo.class);
    }

    @Override
    public Object resolveParameter(ParameterContext parameterContext, ExtensionContext extensionContext) throws ParameterResolutionException {
        return new MyPojo();
    }
}
ExtendsWith
Then you need to tell your test method or class how to resolve the MyPojo with:
@ExtendWith(MyPojoResolver.class)
If it is 1-off for a single method, you can just put it there. If you put it at the class level, it applies to all of the tests. You can also have multiple parameter resolvers defined.
There are other kinds of Extensions that can be written and passed to the @ExtendsWith as well. Be sure to check out the chapter on Extensions. These will end up replacing the Runner, @Rule and @ClassRule that we had in JUnit4.
Summary
This has just been a brief overview of some of the newest highlights. Try it out and let me know what features you find the most useful.